
PowerPoint Transitions: How to Add, Time, and Choose Slide Effects
A transition controls how one slide gives way to the next. This guide covers adding and removing transitions, setting duration and automatic advance, and choosing an effect that suits the event.

What PowerPoint transitions are
A PowerPoint transition is the visual effect that occurs when you move from one slide to the next during a presentation. That is how Microsoft Support defines it, adding that you can control the speed, add sound, and customize the look of transition effects.
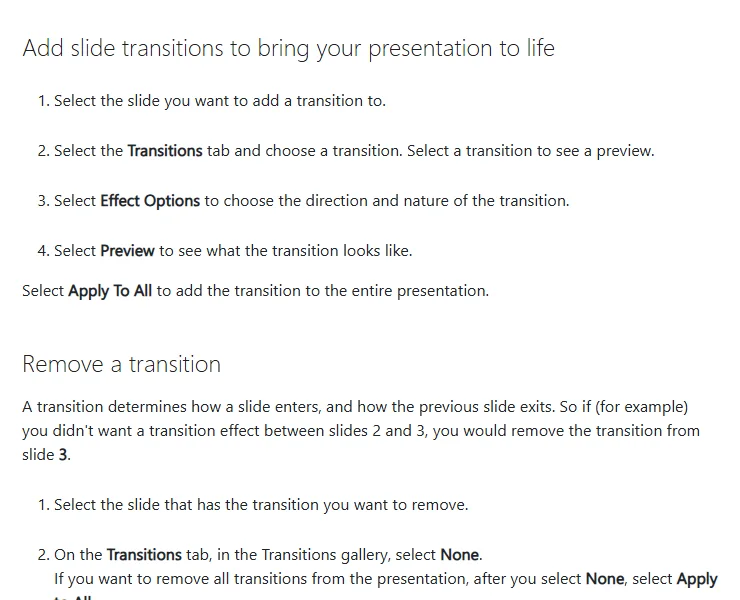
The key idea: a transition determines how a slide enters and how the previous slide exits. So the transition belongs to the slide that is entering. If you do not want an effect between slides 2 and 3, you remove the transition from slide 3.
A well-chosen transition helps the audience feel a change of topic. Too many transitions pull attention away from the content. That is why many formal presentations use one subtle effect for every slide, or none at all. Wider advice on how a slide should look is in our guide to presentation design.
Transitions versus animations
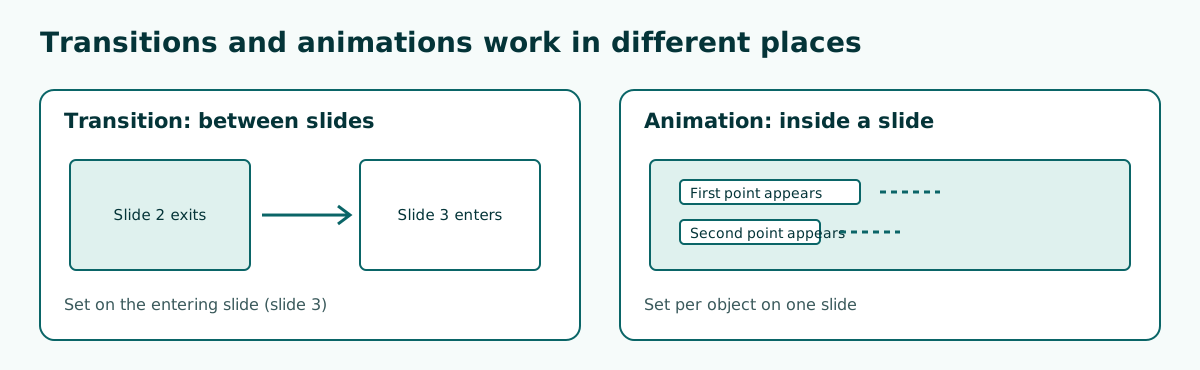
Transitions and animations get mixed up because both make things move. The difference is where they work. A transition works between slides, while an animation works on objects inside one slide, such as bullet points appearing one at a time or a chart that grows.
Scroll the table sideways to see every column.
| Aspect | Transition | Animation |
|---|---|---|
| Works | Between two slides | Inside one slide |
| Applied to | The entering slide | Objects: text, pictures, charts |
| PowerPoint tab | Transitions | Animations |
| Per slide | One transition effect | Many, in sequence |
| Typical use | Moving to a new section | Revealing points one by one |
According to Microsoft, only one transition effect can be applied to a slide at a time. Animations have no such limit, which makes them more involved to set up. Building animations is covered separately in PowerPoint animation.
How to add transitions in PowerPoint
These steps follow Microsoft's guide for PowerPoint on Windows:
- Select the slide you want to add a transition to in the thumbnail pane.
- Select the Transitions tab and choose a transition. Selecting one shows a preview straight away.
- Select Effect Options to choose the direction and nature of the transition.
- Select Preview to see it once more.
- To use the same effect across the whole presentation, select Apply To All.
The transitions gallery is usually longer than it looks. Click the arrow beside it to open every option. If you are building a deck as a team, agree on one effect at the start so everyone's slides feel like one presentation. Splitting a talk between presenters is covered in group presentation.
Setting duration, sound, and automatic advance
The Timing group on the Transitions tab holds two settings that are easy to confuse. Microsoft Support explains them like this:
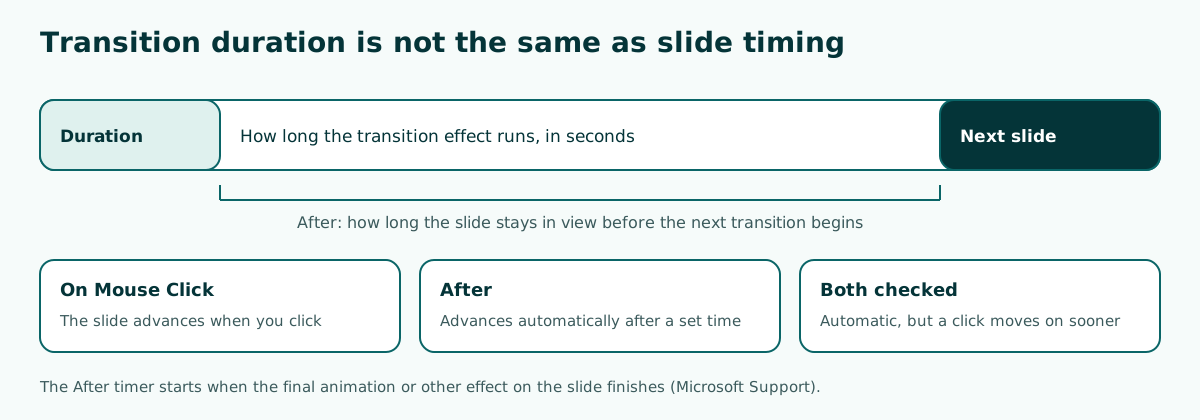
- Duration sets the speed of the transition. A shorter duration means the slide advances faster, and a larger number makes it slower. Type the number of seconds in the Duration box.
- Advance Slide sets when the slide moves on. Check On Mouse Click to advance when you click, or check After and enter minutes or seconds to advance automatically. The After timer starts when the final animation or other effect on the slide finishes.
- With both boxes checked, the slide advances automatically, but you can still move on sooner with a click.
Microsoft also points to the Sound list in the same group for playing a sound during the transition, including Other Sound for your own audio file. For formal talks, leave transition sounds off.
How to change or remove a transition
Because a slide can only hold one transition effect, changing it is as simple as choosing a different effect on the Transitions tab. The old one is replaced. To adjust direction or timing without swapping the effect, use Effect Options and the Duration box as described above.
To remove a transition, Microsoft lists these steps:
- Select the slide that has the transition you want to remove.
- On the Transitions tab, in the Transitions gallery, select None.
- To remove every transition in the presentation, after selecting None, select Apply to All.
Remember the entering-slide rule. If a jarring effect appears when you move from slide 5 to slide 6, slide 6 is the one to clean up. The same habit helps when you inherit a deck full of mixed effects: select every slide, set None, then apply one consistent effect again. If the file feels heavy after lots of effects and media, see how to reduce PowerPoint file size.
Transitions in Google Slides
Google Slides has transitions too, with fewer options. According to the Google Docs Editors Help, the steps are:
- Open a presentation in Google Slides on a computer.
- On the left, click the slide you want to transition to.
- Click Slide, then Transition.
- Under Slide Transition, choose a transition from the drop-down menu.
- To change the speed, drag the slider.
The same panel handles object animations, so transitions and animations live in one place. Google also notes that when presentations are viewed in some browsers, certain animations may not work, so test on the device you will present from.
If the deck moves between Google Slides and PowerPoint, check the transitions after converting, because effect names and types do not always match. Moving between formats is covered in convert Google Slides to PowerPoint.
Choosing transitions to suit the event
No transition is right for every situation, only ones that suit the audience. A simple rule: the more formal the event, the subtler and more uniform the transitions.
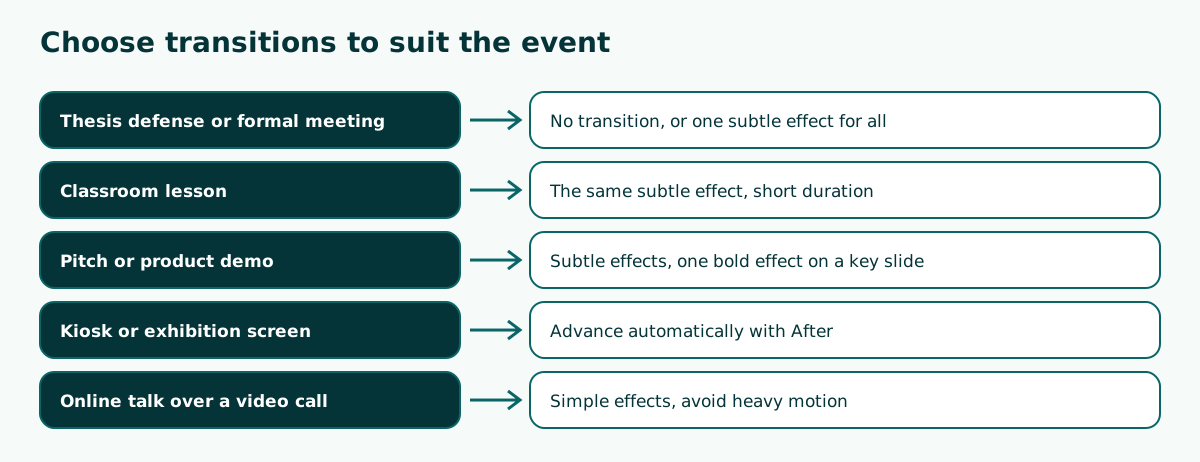
At a thesis defense, examiners focus on the research, so flashy transitions feel out of place. See how the slides are structured in thesis defense presentation. In a classroom, one consistent subtle effect keeps students focused, and the teaching presentation template shows the rest of the deck. In a pitch, one bolder effect on a key slide, such as the headline number, can make that moment stand out.
When a presentation runs without a speaker, for example on an exhibition screen, use After with enough time to read each slide. A rough reading test helps: ask someone who has not seen the deck to read each slide while you time them, then use that number plus a small buffer. For a guided online talk, let slides advance on a click so you can match the pace to questions.
Planning time per slide with Soluslide
The After setting is only useful if you know how long each slide should stay up. That is where an outline with minutes per slide helps. Soluslide drafts an outline from a topic and a duration: slide titles, content points, speaker notes, and minutes for each slide, all editable before you sign in.
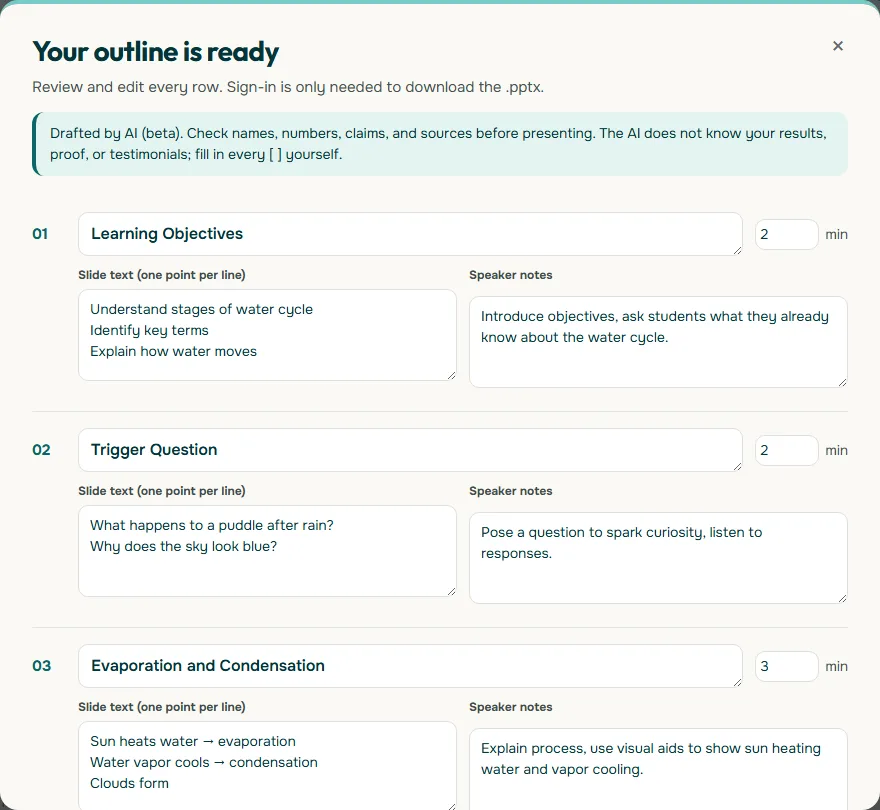
From an outline like this you can decide which slides advance on a click and which can move on by themselves. To work out the number of slides from a time limit, read how many slides per minute. After signing in to the beta, you can download the outline as an editable .pptx file and add transitions in PowerPoint. Try your first outline in the Soluslide outline builder.
Example: a transition plan for a 15-minute lesson
Say you are a science teacher preparing a 15-minute lesson on the water cycle for grade 7. Before you open the Transitions tab, write a plan per slide that separates slides you advance by click from slides that can move on by themselves:
1. The Water Cycle: Sea to Rain       -> Fade, click
2. Opening question for the class     -> Fade, click
3. Evaporation                        -> Fade, click
4. Condensation and clouds            -> Fade, click
5. Precipitation                      -> Fade, click
6. Short water cycle video            -> Fade, click
7. New section: quiz                  -> one bolder effect, click
8. Summary                            -> Fade, click
Every slide uses the same subtle effect except slide 7, which marks the switch to the quiz. No slide advances automatically because the teacher needs to wait for answers. Automatic advance suits a welcome slide shown before class, such as classroom rules that cycle while students arrive.
A plan this simple makes the PowerPoint work quick: select every slide, apply the subtle effect, Apply To All, then change one slide. A full lesson deck is shown in the teaching presentation template.
Transitions in online talks and on other screens
Presentations are now often shown through video calls, school projectors, or meeting room TVs. Every screen and connection treats motion differently, so a transition that looks smooth on your laptop may not look smooth for the audience.
When you share your screen on a video call, the picture is sent to participants as video. Effects with lots of motion can look choppy on a slow connection. The safe choice is a simple, short effect, or none. The same goes for older projectors that respond slowly.
- Test once on the device and screen you will actually use.
- If you present from Google Slides in a browser, remember Google's note that certain animations may not work in some browsers.
- Keep a backup copy of the file on another device.
- Do not put important information only inside an effect, because people who join late will miss it.
If the file will not open on another computer, see PowerPoint won't open.
A transition checklist before you present
- One main effect. The whole deck uses one subtle effect, with deliberate exceptions only.
- Short durations. Transitions finish quickly so there are no awkward pauses.
- Sound off. Unless it is part of the event concept.
- Advance as planned. Slides that need discussion advance on a click, display slides advance automatically.
- Tested on the real screen. Run the slide show once on the device you will use.
With this checklist, transitions support the content instead of competing with it. For a strong start and finish, see how to start a presentation and how to end a presentation.
Common transition mistakes
- A different effect on every slide. The deck turns into an effects catalogue. Pick one and Apply To All.
- Durations that are too long. Slow transitions create awkward pauses, especially in long talks.
- Transition sounds at formal events. Turn them off unless they are part of the concept.
- Removing the transition from the wrong slide. The transition belongs to the entering slide.
- Not testing automatic advance. The After timer counts from the end of the last animation, so animated slides can stay up longer than the number you typed.
- Relying on effects to hold attention. Attention comes from content and delivery. Delivery tips are in how to give a good presentation.
Before you present, run the slide show from start to finish once. Watch for effects that startle or slides that move on too quickly. For richer interaction such as navigation buttons, see interactive PowerPoint.
Frequently asked questions
What are PowerPoint transitions?
Transitions are the visual effects that occur when you move from one slide to the next during a presentation.
How do I add transitions in PowerPoint?
Select a slide, open the Transitions tab, choose an effect, adjust Effect Options if needed, then select Apply To All to use it on every slide.
What is the difference between transitions and animations?
A transition works between slides and is set on the entering slide, while an animation works on objects inside one slide.
How do I remove a transition?
Select the slide and choose None in the Transitions gallery. For every slide, follow it with Apply to All.
How do I make slides advance automatically?
On the Transitions tab, in the Timing group, check After and enter minutes or seconds. The timer starts once the last animation on the slide finishes.
What is the difference between Duration and After?
Duration is how long the transition effect runs, while After is how long the slide stays in view before advancing automatically.
Can one slide have two transitions?
No. Microsoft says only one transition effect can be applied to a slide at a time.
How do I add transitions in Google Slides?
Click the slide in the left panel, choose Slide and then Transition, pick an effect from the drop-down menu, and set the speed with the slider.
Sources
Factual claims in this article refer to the sources below. Sample outlines and prompts are illustrations to adapt.
Related reading
Try shaping your own outline. You can review and edit it before signing in.
Build a free outline