
Teaching Presentation Template: How to Structure a Lesson Deck
A reusable lesson deck structure, from the objective slide to the exit question, grounded in guidance from university teaching centers and W3C accessibility advice.
What a teaching presentation template should contain
A good teaching presentation template is not a color theme. It is a lesson sequence you can reuse: one slide that states what students will be able to do, a question that pulls them in, the content split into small chunks, a check for understanding after each chunk, time for questions, and a closing recap. Fonts and backgrounds come last, and they should mainly serve readability.
The reason to fix the sequence in a template is practical. When you build a lesson deck at 10 p.m. the night before class, the template reminds you to plan the moments where students do something, not only the moments where you talk. The table below is a starting structure for a 45 to 50 minute lesson. Adjust the minutes to your own timetable.
Scroll the table sideways to see every column.
| Slide | Purpose | Suggested minutes |
|---|---|---|
| 1. Title and learning objective | Tell students what they will be able to do by the end | 2 |
| 2. Hook question | Activate prior knowledge and show why the topic matters | 3 to 5 |
| 3. Agenda | Give an organizing frame for the session | 1 |
| 4 to 6. Chunk 1 plus check | One idea, one example, one quick question | 10 |
| 7 to 9. Chunk 2 plus check | Build on chunk 1, then check again | 10 |
| 10. Practice task | Students apply the idea in pairs or alone | 8 to 10 |
| 11. Questions | Planned, protected time for questions | 5 |
| 12. Recap and exit question | Summarize and collect evidence of learning | 3 to 5 |
The rest of this guide explains each part, what research-based teaching centers say about it, and how to make the deck accessible to every student in the room.
Start with a learning objective students can act on
The Eberly Center for Teaching Excellence at Carnegie Mellon University recommends writing objectives by completing the prompt "At the end of the course, students should be able to ____." The same logic works for a single lesson. The center also advises that objectives use action verbs and be measurable, and it lists "Understand X" and "Gain an appreciation for X" as typically vague objectives.
On a slide, that translates into one short sentence with a verb you could actually test. Compare these two versions:
- Vague: "Today: understanding photosynthesis."
- Actionable: "By the end of this lesson you can explain how light, water, and carbon dioxide combine to produce glucose, and label the inputs and outputs on a diagram."
The second version tells students what to pay attention to, and it tells you what your check for understanding should ask. CMU's guidance makes the same point about alignment: objectives, assessments, and instructional strategies should match, otherwise students may feel the test had nothing to do with what was covered in class.
Keep it to one or two objectives per lesson
A single lesson rarely supports more than two clear outcomes. If your objective slide has five bullet points, the lesson is probably two lessons. Split it, and give each deck its own objective slide.
Open with a hook question that activates prior knowledge
The first minutes of class matter. CMU's guidance on lectures notes that attention is high during the first minutes of a lecture and then falls, so the opening is the moment to give students a reason to engage. It also recommends emphasizing relevance by connecting material to current events or student interests.
A hook question does both jobs. It should be answerable from everyday experience, so every student can respond, and it should create a small puzzle that the lesson will resolve. CMU's learning principles explain why this helps: students' prior knowledge can help or hinder learning, and accurate prior knowledge activated at the right time provides a foundation for new knowledge. A hook question surfaces what students already believe, including misconceptions you will need to address.
Examples of hook questions for a lesson deck:
- Science: "A plant in a sealed jar keeps growing for weeks. Where does its new mass come from?"
- History: "If you had to explain the causes of this war in one sentence, what would you say?"
- Math: "A shop offers 30% off, then another 20% off. Is that the same as 50% off?"
Put the question alone on the slide, in large text, and give students time to think or write before anyone answers.
Split the content into chunks and keep cognitive load manageable
The middle of a lesson deck is where most slides go wrong: too much text, too many ideas per slide, and no pauses. CMU's lecture guidance puts the problem in terms of working memory. For novices, new knowledge is "a heavy load on their working memory," and periodic summaries help ease that load and let students chunk the information so it is processed more easily.
The W3C Web Accessibility Initiative (WAI) adds a related point for slide design: it is difficult for many people to read text and listen to the speaker at the same time, so presenters should avoid putting lots of text on slides and move extra detail to a handout or notes. WAI also recommends consistent design across slides to limit cognitive load.
A practical chunk pattern
- One idea per slide. Write the slide title as the claim itself, for example "Chlorophyll absorbs red and blue light" instead of "Chlorophyll".
- One example or visual. CMU recommends a variety of examples, fully explained, with their limitations pointed out.
- A signpost. CMU suggests signposts and transitions that flag important or tricky points, such as "pay attention now, because this is tricky."
- A mini summary. End each chunk with one sentence that restates the idea before you move on.
Keep the detailed explanation in the speaker notes, not on the slide. Your notes become your script, and the slide stays readable from the back row. If you want help writing slide titles as claims, see our guide to writing prompts for AI slide outlines.
Build in checks for understanding after every chunk
A check for understanding is a short, ungraded task that shows you whether the class is ready to move on. The goal is not to rank students but to see, in a couple of minutes, whether the last chunk landed. CMU's Classroom Assessment Techniques (CATs) page describes these as activities instructors use to quickly gauge students' comprehension, and lists several formats that fit neatly onto a single slide:
- Minute Paper: one or two questions asking students to identify the most significant thing they learned, answered in one to two minutes.
- Muddiest Point: "What was the muddiest point in today's lecture?" with one to two minutes to write.
The center notes that CATs give feedback about the whole class's level of understanding, not individual students', and that you can use it to speed up, slow down, or address areas of confusion directly.
CMU's lecture guidance suggests further interactive breaks: pausing to pose a "thought problem" with one to two minutes to reflect and write, or giving short tasks to pairs or trios and calling on a few groups after about five minutes. In a template, make these their own slide type with a distinct layout, so you can see at a glance in slide sorter view whether every chunk has a check after it.
Write the check before the content
Draft the check-for-understanding question right after the objective. If you cannot write a question that tests the objective, the objective is still too vague.
Leave real room for questions
"Any questions?" asked in the last thirty seconds rarely gets an answer. Questions need protected time on the plan and a slide that signals it.
The W3C WAI guidance on accessible presentations gives two concrete reasons to slow down. First, pause between topics so people can process information. Second, when you ask whether anyone has questions, some people with cognitive disabilities need extra time to form their thoughts into words. WAI also recommends repeating questions from the audience into your microphone before answering, so everyone (including anyone relying on captions or a hearing system) hears them.
For large classes, CMU suggests asking students to write questions and pass them forward near the end of class, then answering them immediately, in the next class, or online. In a slide deck, that looks like:
- A dedicated "Your questions" slide after the practice task, with five minutes reserved.
- A backup slide with the two or three questions students usually ask, so you are ready if the room is quiet.
- A note to yourself in the speaker notes: count silently to ten before moving on.
If your lesson runs long, cut a chunk, not the question time. You can move a cut chunk to the next lesson; you cannot recover the confusion that built up because nobody had a chance to ask.
Close with a recap and an exit question
CMU's lecture guidance says a conclusion enhances understanding by synthesizing the material, and that good closings can be summaries (given by the instructor or by students), cliffhangers for the next lecture, or thought-provoking questions. WAI recommends the same shape for any presentation: start with an overview and end with a review of the most important points.
A recap slide works best when it mirrors the objective slide. If the objective said students can "explain and label," the recap should show the labeled diagram and the one-sentence explanation. Then add one exit question that checks the objective directly, for example: "In two sentences, explain where a plant's new mass comes from." Collect the answers on paper or through a quick form; they tell you where to start the next lesson.
A final slide can preview the next lesson with a question you will not answer yet. That is the "cliffhanger" option CMU mentions, and it gives you a ready-made hook for the next deck.
Make the deck accessible to every student
Accessibility is part of the template, not a final check. Building it into the master slides means every lesson inherits it. Microsoft Support's guide to accessible PowerPoint presentations recommends:
- A larger font size (18pt or larger), sans serif fonts, and sufficient white space.
- A unique, descriptive title on every slide, even if it is hidden, because people using screen readers rely on slide titles to know which slide is which.
- Checking the reading order, since a screen reader reads slide elements in the order they were added, which can differ from the visual order.
- Alt text on visuals, strong contrast between text and background, and the built-in Accessibility Checker while you work.
The W3C WAI guidance adds points that matter in a classroom: make text and important visuals big enough to read from the back of the room, use sufficient color contrast (including in graphs), think carefully about motion and animation because some motion can distract or make people ill, and avoid flashing content. During the lesson, describe all relevant visual information aloud, so a student who cannot see the slide still gets the content. WAI also recommends sharing slides and handouts ahead of time in formats students can adapt, such as word processing or HTML files.
For color choices that hold up on a classroom projector, see our guide to readable slide contrast.
For layout principles, see slide design, and set fonts and colors once in the slide master so every slide stays consistent. Use animation sparingly, for example to reveal points one at a time as you explain them, as covered in PowerPoint animation. If students will present in teams, the group presentation guide helps them split content and time, and the basics are in how to make a PowerPoint presentation.
Worked example: a 45-minute lesson outline you can copy
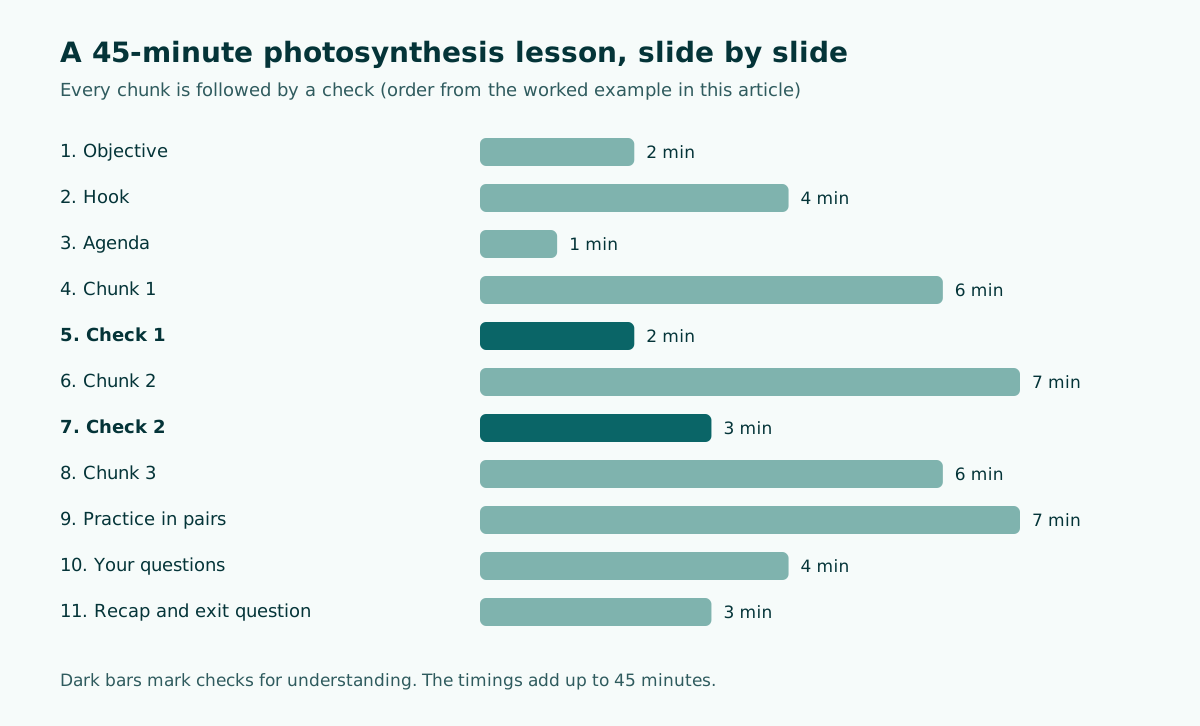
Here is the template applied to a secondary science lesson. Every slide title is written as a statement or question, every chunk ends with a check, and timings add up to 45 minutes.
Lesson: Photosynthesis inputs and outputs (45 min)

1. Objective (2 min)
   "By the end you can explain how light, water, and CO2 produce glucose,
    and label the inputs and outputs on a diagram."
2. Hook (4 min)
   "A plant in a sealed jar keeps growing. Where does its new mass come from?"
   Notes: collect 3 answers, do not correct yet.
3. Agenda (1 min): inputs, the reaction, outputs, practice
4. Chunk 1 (6 min): "Plants take in CO2 through tiny pores in their leaves"
5. Check 1 (2 min): "Which input comes from the air?" (show of hands)
6. Chunk 2 (7 min): "Light energy drives the reaction in chloroplasts"
7. Check 2 (3 min): Muddiest point, write one line
8. Chunk 3 (6 min): "Glucose and oxygen are the outputs"
9. Practice (7 min): label a blank diagram in pairs
10. Your questions (4 min)
11. Recap + exit question (3 min)
    "In two sentences: where does a plant's new mass come from?"
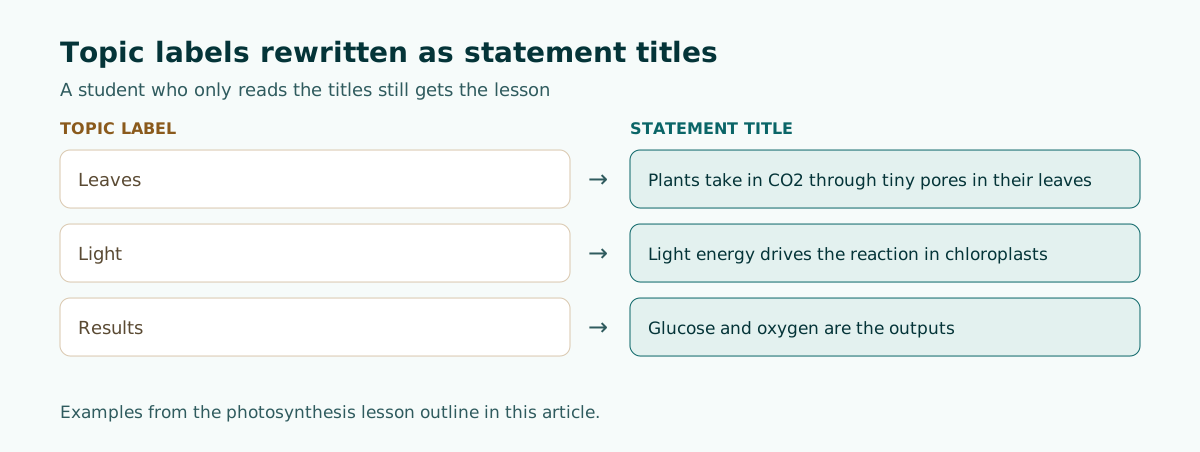
Notice the slide title rewrites: "Leaves" became "Plants take in CO2 through tiny pores in their leaves," and "Results" became "Glucose and oxygen are the outputs." A student who only reads the titles still gets the lesson.
Turning the outline into slides faster
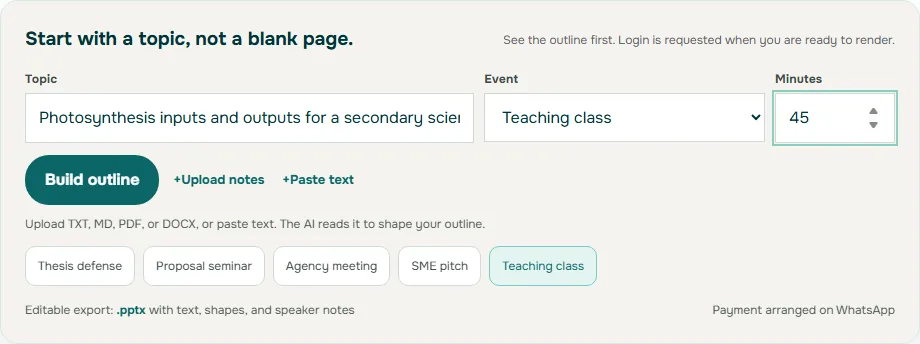
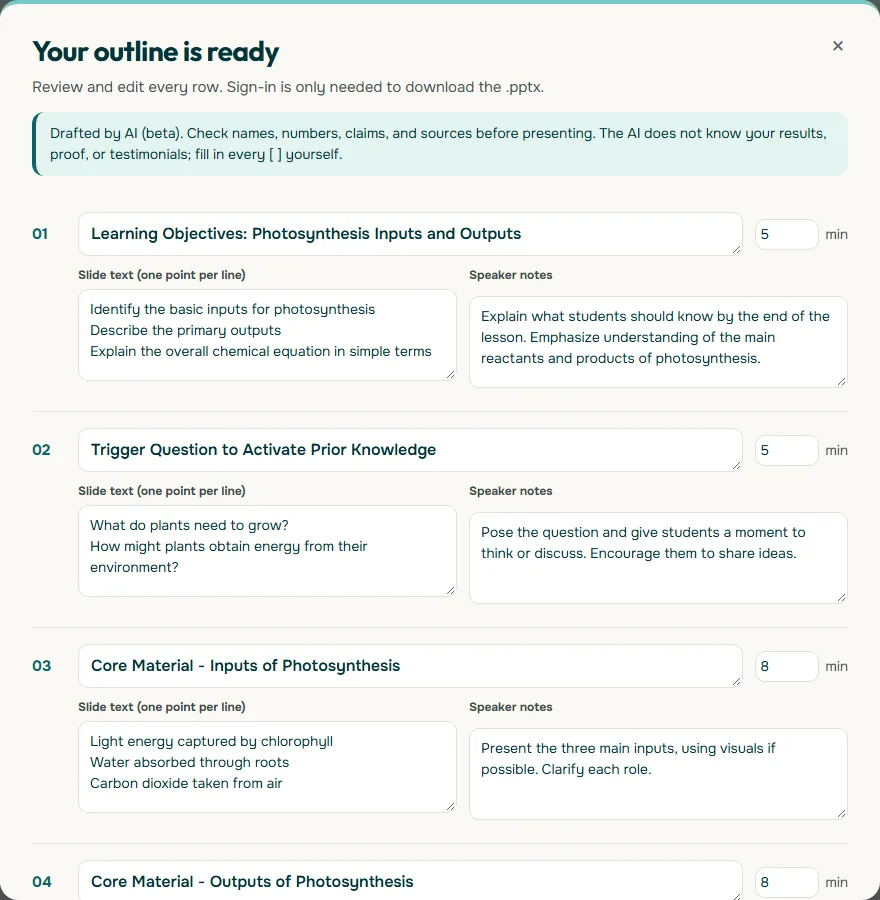
If you already have the material as a handout or lesson notes, you can draft the deck from it rather than starting blank; our guide to building a presentation from a document covers that workflow. Soluslide, currently in beta, can take a topic or an uploaded document, let you choose a teaching event type and a duration, and return a timed slide outline with titles, notes, and minutes per slide that you can edit before signing in. Exporting the result as an editable .pptx requires a beta account, and the file uses standard text boxes and shapes so you can keep refining it in PowerPoint. You can try the outline step in the builder, or compare options in our overview of AI presentation makers.
The two screenshots below use the photosynthesis topic from the example above.
Frequently asked questions
What should a teaching presentation template include?
A learning objective slide, a hook question, an agenda, content chunks with a check for understanding after each, a practice task, protected time for questions, and a recap with an exit question.
How many slides do I need for a 45-minute lesson?
There is no fixed rule. Around 10 to 12 slides is a workable skeleton if each chunk covers one idea and practice and question time get their own slides. Plan by minutes, not slide count.
How do I write a good learning objective for a slide?
Complete the sentence "By the end of this lesson you can..." with an action verb you could test, such as explain, label, or solve. Avoid vague verbs like understand or appreciate.
What is a quick check for understanding I can put on one slide?
The Minute Paper and the Muddiest Point both work: students spend one to two minutes writing the most important thing they learned or the point that confused them most.
What font size should I use on lesson slides?
Microsoft Support recommends 18pt or larger with sans serif fonts and enough white space. Check the slides from the back of the actual room too.
Should I put my full explanation on the slides?
No. Many people find it hard to read text and listen at the same time, so keep slides short and put the detailed explanation in your speaker notes or a handout.
When should I check for understanding in a lesson deck?
After every chunk of content, before you move on to the next idea. Keep it short, such as a show of hands or a one-line written answer, as in the photosynthesis example.
Sources
Factual claims in this article refer to the sources below. Sample outlines and prompts are illustrations to adapt.
- Carnegie Mellon University Eberly Center: Articulate Your Learning Objectives
- Carnegie Mellon University Eberly Center: Lectures
- Carnegie Mellon University Eberly Center: Learning Principles
- Carnegie Mellon University Eberly Center: Using Classroom Assessment Techniques
- W3C WAI: Making Events Accessible (checklist for meetings, training, and presentations)
- Microsoft Support: Make your PowerPoint presentations accessible to people with disabilities
Related reading
Try shaping your own outline. You can review and edit it before signing in.
Build a free outline